TalkBack, Eyes-Free Shell Refreshed --- Now With End-User Settings

$

We are pushing out a series of updates via Android Market for TalkBack and the Eyes-Free Shell. Here is a brief overview of end-user visible changes.

Accessibility Preferences

Going by the principle of things should just work as expected , we have long resisted giving in to having a complex set of user preference settings for TalkBack and friends --- in my experience, if you introduce such a settings menu early on, we as software engineers tend to punt on all complex decisions by turning each question into a complex user-facing dialog. That said, it is now time to gradually introduce end-user settings for some aspects of the various accessibility tools.

Accessibility Preferences

Welcome new application AccessibilityPreferences to Android. What this application does:

  • From an end-user perspective, it provides a single place where you will find preference settings corresponding to each accessibility tool you have installed on your phone.
  • For developers of accessibility tools, it provides a simple means of registering a custom program for managing end-user preferences for that tool.

TalkBack installs its user preferences under this tool. You can tweak a number of settings that affect TalkBack behavior including:

  • Control whether TalkBack speaks when the screen is off --- useful to silence status messages when you have the phone turned off.
  • Control whether TalkBack speaks when ringer volume is set to 0, i.e., phone is in silent mode.
  • Control whether the proximity sensor is used to shut off speech.

Over time, we'll add more settings here as appropriate --- but expect us to be conservative with respect to how many settings show up.

Updates To The Eyes-Free Shell

Here is a summary of updates to the Eyes-Free Shell:

  • Changes the proximity sensor logic so that it is only active when the shell is active; this should be more battery efficient
  • Fixes a race condition bug that can trigger when the shell is being exited as an application is being installed/removed

TalkBack

Here is a summary of changes to TalkBack:

  • TalkBack now includes application-specific speech strategies for some popular applications. This provides context-sensitive spoken feedback.
  • Applications that have such speech strategies defined include Facebook, Stitcher and GoogleVoice amongst others.
  • Implements a settings screen that can be used with Accessibility Preferences
  • Available settings:
       
    1. Ringer Volume (Speak at all ringer volumes, No speech in Silent Mode, No speech in Vibrate and Silent Mode)
    2.  
    3. Screen Status (Allow speech when screen is off, No speech when screen is off)
    4.  
    5. Speak Caller ID (checked/not checked)
    6.  
    7. Proximity Sensor (checked/not checked)

In addition, TalkBack introduces the ability to add application-specific plugins --- expect to see more advancement here in future releases.

AccessibilityPreferences Hints For Developers

If you're a developer of an AccessibilityService, you need to:

  • Implement a preferences screen for your application.
  • Implement this with intent filter:
                

                <intent-filter>

                    <action android:name="android.intent.action.MAIN" />

                    <category android:name="android.accessibilityservice.SERVICE_SETTINGS" />

                </intent-filter>


Share And Enjoy,

Proxy Settings Android Application

Instead of changing the Rom to set proxy as I mentioned in the first post here is the application to make the proxy work in your Android phones.Still you have to root the phone.Rooting can be done using a single click as described in the tutorial in my previous post.


Here is the link to the application.

I have tested this applications with various ROMS,various Android phones and it works very well with proxy as long as it is a http/http(s) proxy...I can browse webpages,use google maps,look at Android Market using the Appbrain application.Make sure to run this application and key in these details :

Proxy Host:-

Proxy Port:- (already set to 8080 by default)

Enjoy using the Android Proxy Settings Application...Make sure to share your comments...I will be posting further updates on this in the blog.So stay tuned!!

Android smartphone for ~£200

Hey there again, heres a list of Android smartphones that u can buy for around 200 pounds.

First of all, good 'ol HTC Wildfire for £226.50 @ Amazon.co.uk


This smartphone have:

  • Android 2.1 (Eclair) support
  • 5.0 MegaPixels Camera
  • 384 MB RAM
  • 512 MB ROM (Inside Memory)
  • Wi-Fi, Bluetooth
  • GPS 
  • FM Radio
  • And everything else that every Android phone have


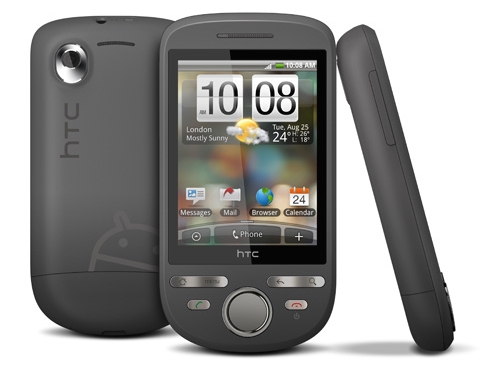
HTC Tattoo for £220.16 @ Amazon.co.uk

This smartphone have:

  • Android 1.6
  • 3.2 MegaPixel Camera
  • 256 MB RAM
  • 512 MB ROM (Inside Memory)
  • Wi-Fi, Bluetooth
  • GPS
  • FM Radio
  • And everything else that every Android phone have

LG GT540 for £174.99 @ Amazon.co.uk


This smartphone have:

  •  Android 1.6
  •  3.0 MegaPixel Camera
  •  256 MB RAM
  •  128 MB ROM (Inside Memory)
  •  Wi-Fi, Bluetooth
  •  GPS
  •  FM Radio
  •  And everything else that every Android phone have


  These smartphones are most popular from the low price Android Phones. And basicly i would choose GT540 just becouse its much chieper and u get the same features like Tattoo

Android vs iOS

Hey everyone, this is a quick summary for Android and iOS features.

iOS 4 vs Android 2.2 Froyo

Devices
iOS: iPhone 4 and iPhone 3GS. Available for iPhone 3G and iPod Touch but some features not supported. iPad (coming Fall 2010).
Android: None right now but HTC Nexus One, Motorola Droid likely to move to Android 2.2.


Availability
iOS: Available to developers now. iPhone 3G S, iPhone 3G and iPod Touch consumers get a free upgrade on June 21. iPhone 4 available on June 24.
Android: Available to developers now. Available to some Nexus One users now. Updates to other devices “coming soon.”


Tethering
iOS: Yes
Android: Yes


Flash Support
iOS: No. Apple says it supports only two platforms: HTML 5 and its app store.
Android: Yes. Beta version of Flash Player 10.1 available on Android 2.2.


Multitasking
iOS: Yes
Android: Yes


Hot-Spot Capability
iOS: No
Android: Yes. Wi-Fi can be shared with up to 8 devices.


Folders
iOS: Yes
Android: Yes


Copy and Paste
iOS: Yes
Android: Yes


Video Chat
iOS: Native support (only on iPhone 4 hardware)
Android: Available only through add-on apps.


Books
iOS: Support for iBooks to download and read digital books.
Android: Available only through add-on apps.


Music
iOS: Available through iTunes; automatic syncing with desktop iTunes. Streaming music only supported through apps.
Android: Built-in ability to play MP3 files, but no syncing with your desktop music. Streaming music available via add-on apps.


Apps
iOS: 200,000 iPhone apps
Android: 50,000 Android apps


Ads
iOS: In-app ads through iAds. Apple sells and hosts the ads and shares revenue with developers. Payment through iTunes.
Android: In-app ads available through Google Mobile ads. Adsense for mobile ads is in beta mode for developers.


E-Mail
iOS: Unified inbox combines multiple e-mail accounts. Threading of conversations.
Android: No unified inbox. Threading available in Gmail.

Wtf is Android ?

Hey,

So.... what the fuck is Android ? Android is an OS for Smart Phones and tablet pc's created by Android Inc. but later purshased by Google Inc. OS is based on Linux kernel. ccording to NPD group, unit sales for Android OS smartphones ranked first among all smartphone OS handsets sold in the U.S. in the second quarter of 2010, at 33%. Blackberry OS (RIM)  is second at 28%, and iOS (iPhone) is ranked third with 22%.

Android have HUGE number of develepers creating apps for the OS, most of them are free, some almost free (you how to pay for more functions). This is good thing, knowing that iPhone users have to pay for the apps they download.

Analytics say that in the neear future Android Phone will completely take over iPhone and Blackberry users.


So here i start....

Hey everyone, and welcome to my blog for Android Phone users.

Here i will try to post news about android phones, android software and stuff like that.

So thats it for now, will post an article very soon.

A step-by-step guide to set up proxy in Android mobiles


Are you a proud owner of one of the Android mobiles- Nexusone, HTC desire, Droid, Galaxy, etc? Or are you still on the search to see if Android mobiles are really worth all the hype? Then, our say would be “Android is one of the amazing cutting edge technologies of today which has features that no mobile ever can imagine”. Be it the flexibility in customization or the speed and power, Android phones rock.

One such speciality is that you can run any and every website that can be run on a computer owing to the HTML5 compatibility. Which means that you can surf, mail, chat upload and do wonders with your pocket-sized Android mobile! But the million dollar question is HOW TO ENABLE PROXY SETTING FOR THE ANDROID PHONE EASILY

Today most colleges and workplaces are wifi enabled with a local proxy configuration. It is quite obvious that the wireless network can be used for net access only with the proxy enabled. To enable proxy settings you’ll have to install custom ROM and for that ROOTING is essential. Tracking how to do that can be a cumbersome task. And that's where we come to help you do it quickly and easily. Read on !!!


ALL YOU NEED TO DO

  • Root your android mobile

  • Install custom ROM (Open Desire)

  • Set the proxy for the wireless network followed by Orbot installation
ROOTING ANDROID MOBILE (For Windows users)

REQUIREMENTS

Unrevoked3 for Windows – download here
PREPARING YOUR MOBILE


  1. Incase you have already installed HTC Sync, uninstall it.

  2. Install the hboot driver following these steps. Note: Though the steps given in the link.

  3. Reinstall HTC Sync.

  4. You would have downloaded a file called reflash-bundle.exe. Double click it.

  5. It will ask you to specify the download destination. Give a rememberable location.

ROOTING
  1. Go to the place where you installed Unrevoked.
  2. Ensure that “USB DEBUGGING” option is turned on.
  3. Select SETTINGS-"APPLICATION-DEVELOPMENT "on your Android mobile.
  4. Conect your android phone to computer through USB.
  5. Run reflash.
  6. It may take some time. Meanwhile your phone is rooted automatically.
  7. The operation has successfully if you don’t get stuck up anywhere in the middle.
  8. And at the end of all this, your phone is rooted !!!
POST-ROOTING TASKS

Once the rooting process is completed successfully, HTC Sync can be installed again.So, Finally, your android mobile is rooted and you will be in the “Recovery mode”.
Just restart your mobile in the “Normal mode” and boom !!! you have the root permissions !!!

ROOTING ANDROID MOBILE (For LINUX Users)

REQUIREMENTS

  1. A blank cd
  2. A CD/DVD writer installed with a good software to burn with. (Don’t have a burner? Try this software )
  3. A Linux Live CD (Don’t have? Try Slax)
  4. If on a wireless network, Download “Unrevoked” for Linux and copy it onto a USB stick or your phone’s SD card.
STEPS
  1. Burn your Linux Live CD to your blank CD using the burner.
  2. Put the burnt CD in the CD drive and restart the system.
  3. Your CD should start booting. If not, change the boot sequence and make your CD to boot before your hard drive.
  4. You will see Slax start screen. Select “Slax Graphics Mode (KDE)“.Wait for it to load.
  5. The Slax desktop opens. Start Firefox using the icon in the taskbar at the bottom, and go to: http://unrevoked.com/.
  6. Select the name of your Android mobile, click “Unrevoked3″ and select “Download for Linux”. Click Save when prompted.
  7. If you are on a wireless network just copy the “Unrevoked” software that you previously put in your USB drive or SD card to the Desktop.
  8. Extract the downloaded file. (Detailed steps given below)
  9. On your android phone, select Settings->Applications->Development and check if “USB Debugging” Option is turned on.
  10. Connect your mobile to the USB cable.
  11. Run “Unrevoked”(reflash) and rest while it automatically roots your mobile.
  12. If you finally see a “success” message you know that you have a rooted phone now!!!
HOW TO EXTRACT THE FILE DOWNLOADED FROM FIREFOX
  1. Close any opened windows. Go to Slax Desktop.
  2. Double-click the HOME icon on the Desktop- click Downloads.
  3. Right-click reflash.tar.gz and select Preview in Archiver
  4. In the window that opens right click the file, and select “Extract”
  5. When it asks you to select a location, click the Folder icon next the text box (named root) and select Downloads
  6. Click OK.
POST ROOTING TASKS
Once the rooting process is completed successfully, HTC Sync can be installed again.So, Finally, your android mobile is rooted and you will be in the “Recovery mode”.
Just restart your mobile in the “Normal mode” and boom !!! you have the root permissions !!!

WHAT ALL CAN I DO WITH A ROOTED PHONE???

You can
    • run any application that requires ROOT permission like


          • Shootme (allows you to take screen shots)

          • Titanium Backup(back up all apps and apps data)


    • install custom ROMS like the leaked versions of Froyo which aids you to enable proxy , our ultimate aim!!!

    • install custom themes and Bootscreen .

    • install all your applications in the memory card rather than in the phone.
ALL U NEED TO DO

  • Root your android mobile

  • Install custom ROM (Open Desire)

  • Set the proxy for the wireless network followed by Orbot installation
The next step is installing Custom Rom that supports proxy connection. One such Rom is Open Desire I will be talking exclusively on how to install the Rom following that will describe on how to use the proxy settings. You need to install Rom Manager to install Rom without any problem

STEPS TO INSTALL A ROM
  1. Take a backup of all data and application. This is very important.
  2. There is an option to do it with ease in ROM Manager called “Backup current ROM”.
  3. Download the ROM file from the post on XDA. Some custom ROMs like the HTC Sense Froyo need a radio file. If so, then download that file too.
  4. Connect the Android mobile to your system in the Disk Drive mode.
  5. Copy the downloaded ROM file( compulsorily zipped) and a radio file (if needed) into the SD card.
  6. Unmount the phone.
  7. Eject the SD card and change the phone mode to “Charge Only”.
  8. Reboot the mobile into in Recovery mode.
    • STEPS TO REBOOT
    1. If you have installed ROM Manager, choose “reboot into Recovery” option.
    2. Else if you have installed adb, just open Command Prompt/Terminal and enter the command: adb shell reboot recovery.
    3. Else Turn off your phone->Hold Volume Down key->select Recovery by pressing Power button.
  1. Now you will be in the Recovery mode.
  2. Select the zip file (ROM file)from the SD card and install it.
  3. Specify which ROM you wish to install from the given list.
  4. Once the ROM is installed, keep pressing the back button until you reach the start screen of Clockwork Recovery.
  5. Reboot the system now.

NOTE: If the ROM installation need a new radio installation to complete, check if there is any specific steps in the ROM topic, if not , repeat steps 9-12, but select the zipped radio file instead of the zipped ROM file in step 11.

15. The phone will automatically restart and attempt to boot in the custom ROM.

ABOUT OpenDesire

OpenDesire was made with made purely for the HTC Desire and is compiled from a variety of public repositories, OpenDesire is NOT a port of any HTC ROM, it is compiled from source purely with the exception of the Google Apps for which the source code is not publicised.

OpenDesire was built with stability and reliability in mind and therefore does not contain any additional applications. Since version 3.x some community maintained repositories from CyanogenMod have been included in the release.

FEATURES

  • Built 100% from source (with the exception of Google Apps)

  • 2.6.34.x kernel

  • Google Apps

  • Superuser by ChainsDD

  • Legacy A2SD with Cache2SD

  • Busybox

  • 720p camcorder support

  • FLAC / WMA / WMV media support

  • Deodexed & Zipaligned

  • many more mods/tweaks & hacks

ALL U NEED TO DO

Root your android mobile
Install custom ROM (Open Desire)
Set the proxy for the wireless network from settings followed by Orbot installation.

Here are some of the pictures showing the proxy settings in my phone..


Once all these settings are done you can browse internet via proxy through the browser.To enable using the applications via proxy Orbot installation is necessary.


Orbot:-
Install Orbot to enable using all applications via proxy settings!!
Orbot is an application that allows mobile phone users to access the web, instant messaging and email without being monitored or blocked by their mobile internet service provider. Orbot brings the features and functionality of Tor to the Android mobile operating system.
Orbot contains Tor, libevent and privoxy. Orbot provides a local HTTP proxy and the standard SOCKS4A/SOCKS5 proxy interfaces into the Tor network. Orbot has the ability to transparently torify all of the TCP traffic on your Android device when it has the correct permissions.
Orbot can be installed from android market.
I will be adding more details to the guide in future...Please post your queries,doubts in the comments section...I will try to answer them!!

Powered by Blogger